Showing posts with label fried foods. Show all posts

Thursday, October 6, 2011

Vegan Mofo: Tempeh Sticks

I've written about tempeh  before. I love it. Sometimes I feel like I could eat it everyday and never tire of it.  These tempeh sticks are a great, fun way to prepare it. They're sort of like a vegan, whole foods version of chicken fingers.  You can even cut them into smaller sizes for tempeh nuggets.

One of my bosses taught me how to make tempeh sticks, which are really so simple and delicious you'll wonder why you never thought of them before. My former boss used a few different ingredients, though,my biggest change is that she used corn meal instead of masa harina. I enjoy the texture of masa harina better than that of cornmeal for this recipe, and I love that this simple change gives you huge boost in the b vitamin niacin, plus calcium and iron, among other nutrients.

Like I said, these remind me of chicken fingers, but I usually make them as a comfort food, with mashed potatoes or millet mash, and greens. They're equally great with agave mustard or gravy.

Tempeh Sticks
by Christina Terriquez

Ingredients
1 package tempeh
soy sauce or tamari
fresh grated ginger or garlic, if desired
masa harina flour
sea salt
seasonings like paprika or garlic powder, if desired
safflower or sunflower oil

Directions
Cut tempeh into slices or nuggets as desired. I think they are best when they are sliced 1/4"-1/3" thick.

Steam or blanch the tempeh for at least 15 minutes.

In a heat proof bowl, make your marinade using 1 tablespoon soy sauce, 1/4 cup water and ginger juice, crushed garlic, or your favorite seasoning and add tempeh. I often skip this step in favor of the lazy person's method: just sprinkle 1-2 teaspoons of soy sauce over the steamed tempeh.

Put 1/2 cup masa harina flour in a pie plate or wide bottomed bowl. Season it with salt and your favorite breading seasonings. I usually use paprika and garlic powder.

Dredge each piece of tempeh through the masa and lightly tap to remove excess flour.

Heat oil over medium heat. When oil shimmers, add tempeh and fry until golden brown. Drain on paper towels.


Notes
Always cook tempeh for at least 20 minutes total. I often steam or blanch it to get rid of the bitter/sour flavor, and opens it's pores so it absorbs flavor better, but the cooking time is also important since the soybean use in tempeh production are only partially cooked. If tempeh is not properly prepared, it can be hard to digest and create upset stomach. 


Monday, October 3, 2011

Vegan MoFo: Chickpea Frittata


Last week, when I was shopping, I noticed a new line of Italian convenience foods, Lucini Italia. I had never heard or the brand, but one item that caught my eye was their Tuscan Chickpea Frittata mix. It sounded delicious, but I vaguely recalled reading something by Mark Bittman about socca and chickpea fries last year, and thinking how simple those recipes seemed, since they were basically just chickpea flour, salt, water and olive oil.

Sure enough, I read the ingredients and the only thing the package contained was chickpea flour. I decided to simply buy chickpea flour instead of the Tuscan Chickpea Frittata mix, and hope I could find a suitable recipe, thinking that on the very small chance we didn't like the frittata, I could always find other ways to use the chickpea flour, and that the chickpea flour was more economical*.

I was already dreaming things to top the frittata with, or bake into it, before I had even paid for my groceries. Once I got home, I found a perfect recipe (though when I made it, I used a lower temperature).


The frittata baked up wonderfully and looked like the most gorgeous, perfect cornbread. While it was baking, it doubled in size, although it did sink back down as it cooled. When it cooled enough to cut, it sliced beautifully and looked like polenta. The first night we ate it, I had some fresh, gorgeous, super-flavorful vine ripened tomatoes, decided serve the frittata with tomatoes two ways; first, a raw tomato, basil, and garlic relish, as a topping and second as Lebanese-style green beans.


With the leftovers, I reheated the frittata in the toaster over, and topped with seared crimini mushrooms and spinach in a garlic white wine sauce.


The frittata was a little dry on the second day, so I would cook it a little bit less next time (I didn't time it, just watched it and cooked it until it seemed done, since I cooked it at a lower temperature). The hard, dry texture seemed perfect for frying, and since JD hate mushrooms and spinach, I pan fried his portion. He loved it, and it was much easier to fry than polenta, which always splatters for me.


*All the reviews of Lucini Italia's food that I've seen have been very positive, so I'm sure they're very good, and they apparently grind their chickpeas much finer than anyone else. I used Bob's Red Mill chickpea flour, which is stone ground and was about the same price for twice as much product. As I haven't tried both, I can't say how they compare, in terms or flavor or texture.

Friday, November 19, 2010

Madeline's Mocheesi Sticks


I have been super excited about posting this recipe all month! I just had to wait until I had mochi to make it.

Mocheesi Sticks are the invention of my amazing, incredibly talented friend, Madeline Pizzo. She developed her original recipe as her final project for The Natural Epicurean Academy of Culinary Arts. She very graciously gave me permission to post my version here. Madeline is truly awesome, and she even has a vegan brownie named after her!

The individual steps for this recipe are all easy, but the recipe does contain a few steps, and it can be a bit time consuming.

Madeline, and her mochi mozzarella sticks singlehandedly converted me from being staunchly anti nooch, toward a (reserved)pro nutritional yeast stance.


I love this version of vegan mozzarella sticks because, while it is a fried food, it is mostly comprised of a whole and minimally refined ingredient. Especially for a cheese alternative. Mochi is traditionally made of cooked sweet brown rice that is pounded, then dried in cakes.

Madeline's Mocheesi Sticks

4 cups water
2 tablespoons umeboshi vinegar

1 cup panko
1/2 cup whole wheat flour
2 tablespoons nutritional yeast
1 teaspoon sea salt
2 teaspoons garlic powder
1 teaspoon dried oregano
1 teaspoon dried basil
1/2 teaspoon paprika

1 package Grainaissance plain mochi

safflower or sunflower oil for frying

Directions
In a 2 quart saucepan, heat water and umeboshi vinegar to a rolling boil.

While waiting for water to come to a boil, make seasoned breadcrumbs: combine panko, flour, nutritional yeast, sea salt, garlic powder, dried oregano, dried basil, and paprika in a wide but shallow bowl, like a pie plate or a baking dish. Mix well and set aside for now.

Cut mochi into sticks that are approximately 1/2" x 1/2" x 3".


Add 4 or 5 pieces of mochi to the boiling water at a time, and cook until mochi softens slightly. Mochi should still retain its shape. Pull each piece of mochi out of water and gently roll in seasoned panko, then lay on a flat surface, like a cutting board. Repeat until all mochi sticks are covered in panko.


Heat 1/2" of oil in a cast iron skillet over medium heat. Once oil is hot, carefully add mochi sticks in a single layer, and fry, turning once so all sides are golden brown. Do not cook too long, or mochi will melt too much and gush out of breading. You will probably need to fry in two or three batches.


Drain mochi sticks on paper towels. and allow to cool slightly.


Serve sticks warm with a tangy dip, like marinara or sun dried tomato pesto.

Notes
Mocheesi sticks will be molten, with a consistancy like melted cheese, so be careful.

Umeboshi vinegar is not actually a vinegar, it's a brining liquid. It's very salty and sour, and helps give a cheesy bite to the mochi. The nutritional yeast completes the cheesy flavor.


The step of boiling the mochi is important because it helps soften the mochi, flavor it, and gives it enough moisture to bind to the breading.

Plain mochi is very bland, so the seasonings are important and add layers of flavor.

Panko is a Japanese style breadcrumb that helps fried foods stay crunchy.

Friday, November 12, 2010

Spinach, Roasted Poblano and Potato Empandas

Spinach, roasted poblano and potato empanada

Since all my posts this week have been about quick and easy meals, eating out, or convenence products, I've felt illogical guilt and made semi-complex meals, even when I've been super tired from work.

After work today, I needed to stop and pick up a few items from the grocery store. While there, I decided to make chick'n and yellow rice for dinner, but instead of using some form of chicken analog like usual, I thought I'd mix it up and try using some of the chickpeas I made earlier in the week, so it would be a bit healthier and little more satisfying.

I started making chick'n and yellow rice after Daisy Martinez inspired me with her show Daisy Cooks! (if I ever have a show, I want some kind of punctuation in the title). My version of this dish usually looks similar to hers, but that's where the similarities stop. I often use brown rice, she always uses white. She uses about 1 tablespoon of salt per cup of rice, in addition to the olives and the chicken stock. I think that's an insane amount of salt! She uses sofrito and recaito and her dish gets its gorgeous yellow color from achiote oil. I use mirepoix and turmeric for color. You get the point.

There's just something about this dish that always makes me want more. I was so excited about eating it tonight. But it was missing something. I don't think it was the fake meat. I actually really loved the texture of the chickpeas. The rice was too sweet, and some kind of tang was missing. JD and one of our friends, who joined us for dinner, both enjoyed it, as did I, just....not as much as usual. Mostly because I was expecting a very specific flavor, and this just wasn't it.

Chickpea and Yellow Rice

But I was really pleased the other part of the meal, savory empanadas! I made a vegan chorizo, potato and caper version, and a spinach, roasted poblano and potato version. These actually would have been perfect for last week's Iron Chef challenge. It's odd, now that I think about it, since the challenge, I cannot get enough potatoes.

Closeup of soy chorizo, potato and caper empanada

Both empanadas, side by side

I thought up this dish while I was at the store today, when I saw the veggie chorizo. For some reason the chorizo seemed like it would be perfect with potatoes and capers, but I tasted a little flat. I think maybe some daiya would help next time.

For the Spinach, Roasted Poblano and Potato version you'll need:

2 large russet potatoes, cut into 1/2" cubes and boiled
2 teaspoons olive oil
1/2 an onion, minced
half a roasted poblano, minced
1 cup frozen spinach, chopped
1--2 heaping tablespoons Vegenaise
sea salt
seasonings of your choice, including, but not limited to: garlic, garlic powder, onion powder, nutritional yeast, pimento stuffed olives, capers, roasted red peppers, black pepper, red pepper flakes, etc.
empanda dough, pie dough or puff pastry dough, see note
oil for frying, optional

Directions
After boiling potatoes, drain them and set them aside.

Heat olive oil in a small skillet. Add onion and sauté until translucent. If using fresh garlic, add it now, mincing or pressing first. Add poblano pepper and sauté for a few minutes. Add spinach and heat through and cook for a few minutes so liquid can evaporate.

Add potatoes and mash them up a bit, so some are broken and some are still whole. Turn off heat and add Vegenaise. Taste and adjust seasonings. Potatoes should be chunky, and have a creamy but not liquidy consistency.

I used premade emapanda wrappers, and filled them with about 1/4 cup of filling each, then fried them in safflower oil, but the size and amount of filling needed for each empanada is totally up to you. if you don't want to fry them, you can bake them.

As far as seasoning goes, I used a bit of nutritional yeast for a slightly cheesy flavor, plus freshly ground black pepper and garlic.


Spinach, roasted poblano and potato empanada

I also made sparkling raspberry lemonade with Topo Chico, lemons and some leftover raspberry syrup.
P.S. Sorry for the awful pictures lately. I don't know why, but I can't get photos to come out the way I envision them lately.

Sunday, November 7, 2010

Vegan MoFo Iron Chef Challenge

When the first Iron Chef Challenge of Vegan MoFo 2010 was announced as mashed potatoes, I immediately knew what I was going to make: Samosas! But I couldn't decide between plain white potato or sweet potato samosas.


I ended up making a half-batch of each. I made one batch of dough, and added sautéed spices, onion, garlic, sweet peas, sliced almonds and dried currants to each batch of mashed potatoes. I really love this combination, and enjoy how much character each ingredient brings to the whole dish. The spices bring the heat and flavor, but the sweet peas and currants help cut the heat, and the almonds bring a nice crunch.

I love samosas, and I like all the various ways you can customize them. You can use different spices, different dried fruit, different vegetables, and different nuts, or completely omit the fruit, vegetables or nuts based on what you like, and what you have.


I also made a small bowl of fresh apple tamarind chutney. It was basically about some tamarind paste, a bit of yellow mustard, agave to taste, salt, ginger and garlic, mixed up, then stirred together with one apple, which had been peeled and minced.


Since the challenge was mashed potatoes, I mashed these potatoes completely, although I usually like them a bit chunky for samosas. Either way is nice, it's just a personal pereference. You can probably tell from the first picture that my sweet potato samosas were a little flatter. When using sweet potatoes, you need to make sure they are very well drained, since they tend to contain more moisture than white potatoes.

Wednesday, March 10, 2010

Cuban Dinner, Part 1

Savory tostones covered with pineapple and yellow tomato salsa

I know that I've been neglecting my blog terribly. I always find that when I have time to blog, I don't have much inspiration, and when I have inspiration, I haven't any time. Lately I've had the extra obstacle of being broke much of the time, which sucks inspiration right outta me. Thankfully, I had was able to make it to the most recent Addie's Eat Up, which greatly helped me stir up some creativity.

There are a lot of dishes that I love but for some reason, rarely think of making--though once I take a bite, I wonder why the hell I don't make them all the time. This meal is one of my favorites, and most of the ingredients are staples, aside from the cilantro and plantains, so there's really no excuse to not have this once a month, at a minimum. I like to eat the salty tostones with a mango or peach and tomato salsa or pineapple tomatillo salsa. To complete the meal, add some leafy greens, like green cabbage water sauteed with cumin, a fresh green salad or some blanched kale.


My Cuban Menu:
Salty Tostones, with fresh fruit salsa (recipe below)
Black Beans with Roasted Peppers (recipe below
Cilantro and Lime Brown Rice (recipe in part 2)
Garlic Cilantro Sweet Potatoes (recipe in part 2)
Sweet Tostones (recipe below)


Tostones
by Christina Terriquez

The tostones are pretty simple, as long as you're comfortable around hot oil. I like to use my wok with draining rack, cooking chopsticks, and spider strainer whenever I deep fry. I also typically use safflower or sunflower oil for deep frying, but rice bran oil and peanut oil are two other choices.

Ingredients
plaintains
oil for deep frying
sea salt (optional)
powdered sugar (optional)

Directions
Peel plantains and cut them into 1-inch long segments.

Prepare your draining station. Place 3 to 4 layers of paper towel over one heat resistant plate or platter and place in reach of your stove, but far enough away that it will not catch fire. Repeat with a second plate. If you will be topping with sea salt, get that ready. If you will be using powdered sugar, place a small amount in a hand held strainer and place the strainer in a bowl. Place powdered sugar, bowl and strainer out of the way for now.

Heat at least 2 inches worth of oil over medium heat in a wok or deep cast iron pan. Oil is ready when small bubbles immediately form around wooden chopsticks when they are submerged in oil, or when a small piece of food floats to the top of the oil almost immediately when added to hot oil.

Fry plantains in batches or 4 or 5 pieces until golden brown. Drain and allow to cool.

Carefully smash each fried and cooled plantain piece and fry again until edges brown. Drain and sprinkle with salt or use hand held strainer to cover tostones with an even layer of powdered sugar. Serve immediately.

Notes
-If your plantains are less ripe, they will produce a crispier final product, but be harder to smash for the second fry. These are better for salty tostones served with salsa.

-If your plantains are extremely ripe--very yellow skin with dark brown or black spots--they will actually puff up during the second fry and produce fritter-like tostones, they're almost like banana donuts! For this reason I enjoy these most when topped with a little powered sugar, although they are interesting when sprinkled with sea salt as they have a great sweet/salty contrast.


Spiced Black Beans
by Christina Terriquez

Ingredients
1 large jalapeno
1/2 red bell pepper
2 teaspoons olive oil
1 small white onion, diced
sea salt, to taste
3--4 cups cooked black beans (you can use 2 16 oz. cans)
2 cloves garlic, minced

Directions
Roast jalapeno and red pepper until skin is blackened. Place in a covered bowl or paper bag to cool for 10 minutes. Carefully peel the skin off the jalapeno, slice pepper in half, cut out seeds and white strings and mince. Peel skin off red pepper, cut in half, and reserve one half for another dish. Discard seeds and strings from remaining half and dice roasted red pepper.

Heat oil in 3 quart saucepan. Add onion, a pinch of salt and saute until onion is soft and translucent. Add red pepper and jalapeno and saute for 1 minute. Add beans, and garlic and simmer for 10 minutes. Adjust seasoning to taste.

Garnish with cilantro or avocado.

Notes
-I prefer soaking then pressure cooking pretty much all my beans in large batches with a digestive aid like bay leaf, epazote or kombu. This greatly improves their digestability and ensures they are tender and flavorful. Also, it enables me to use one small portion at a time as I need it.

-Try adding other spices like cumin.

-Use different peppers like poblano or serrano or increase or decrease amount to adjust heat.

-Use yellow or orange bell peppers or a combination for a more colorful dish.

Tuesday, January 16, 2007

Samosa Tutorial

Sorry for the long delay, but as promised, here's a new tutorial. I'll try posting about the chutney soon. I think I may try a more macrobiotic-friendly version of samosas soon, but until then, here's a vegan version.

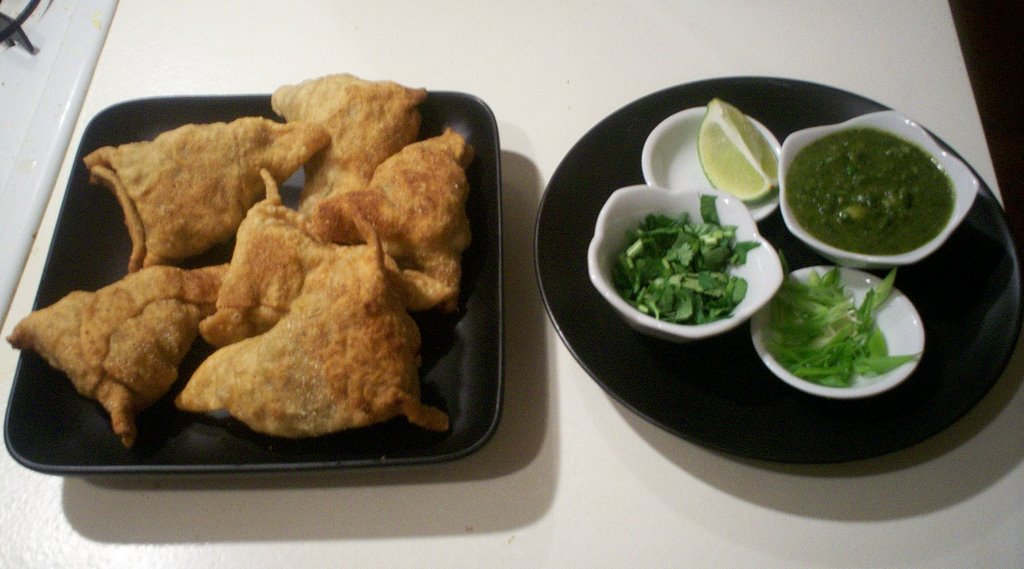
Samosas with Pomegranate Cilantro Chutney and condiments

A little backround on this tutorial: I had a hankering for samosas one evening when I happened to be feeling experimental. I decided that learning how to make them would serve me better and be much more useful than simply going out to find some, either frozen or take-out (who knows what kind of preservatives and additives would be in them?). By sheer luck, I happened to have three small potatoes leftover from the Thanksgiving mashed potatoes I made--I don't normally have potatoes in my home--but I did not have any peas, and to me, those ingredients are the basis for samosas. A quick call to JD ensured that he had some, which he'd bring over before he came for dinner. A little online research and some calculations gave me a basic idea of what I'd be doing, but I still wasn't sure how to roll the dough, fill the dough, or achieve the proper shape. I adjusted the ingredients of the dough a bit, since most recipes called for 2 cups of flour, which I knew would make way too much, and tried following the only set of directions I could find. The directions seemed to skip a few steps, and they didn't roll the dough into large enough circles, so I decided that the next time I made samosas-because there would definitely be a next time-I would take pictures and post a tutorial. After a bit of practice, they really are quite simple.

Samosas
Christina Terriquez

For crust:

1 cup organic white wheat flour
2 teaspoons organic safflower oil
1/4 teaspoon unrefined sea salt
1/3--3/4 cups water

1-3 cups of organic safflower oil, rice bran oil, or sunflower oil for frying

Filling:
1 teaspoon organic olive oil
1 tablespoon (or to taste) curry powder or a mixture of your favorite Indian spices such as:
coriander, tumeric, ground clove, ginger powder, cumin, chili powder, etc.
1/4 cup organic onion, diced (optional)
1 inch fresh ginger, peeled and minced (optional)
1--2 cloves organic garlic, minced (optional)
3 medium organic potatoes, boiled until soft and slightly mashed
1/2--1 cup organic frozen peas, thawed
unrefined sea salt
1/4--1/2 cup organic toasted slivered almonds (optional)
1/4--1/2 cup organic currants, raisins or sultanas (optional)

To prepare dough:

Shift flour and salt into a medium sized bowl. Add oil and mix until texture resembles a fine sand. Add 1/3 cup water and mix until flour comes together as a ball. More water may be needed. I usually use 1/2 cup. Knead dough for about 5 minutes, until dough is smooth and soft. Set aside and let dough rest for about 15 minutes.

To prepare filling:

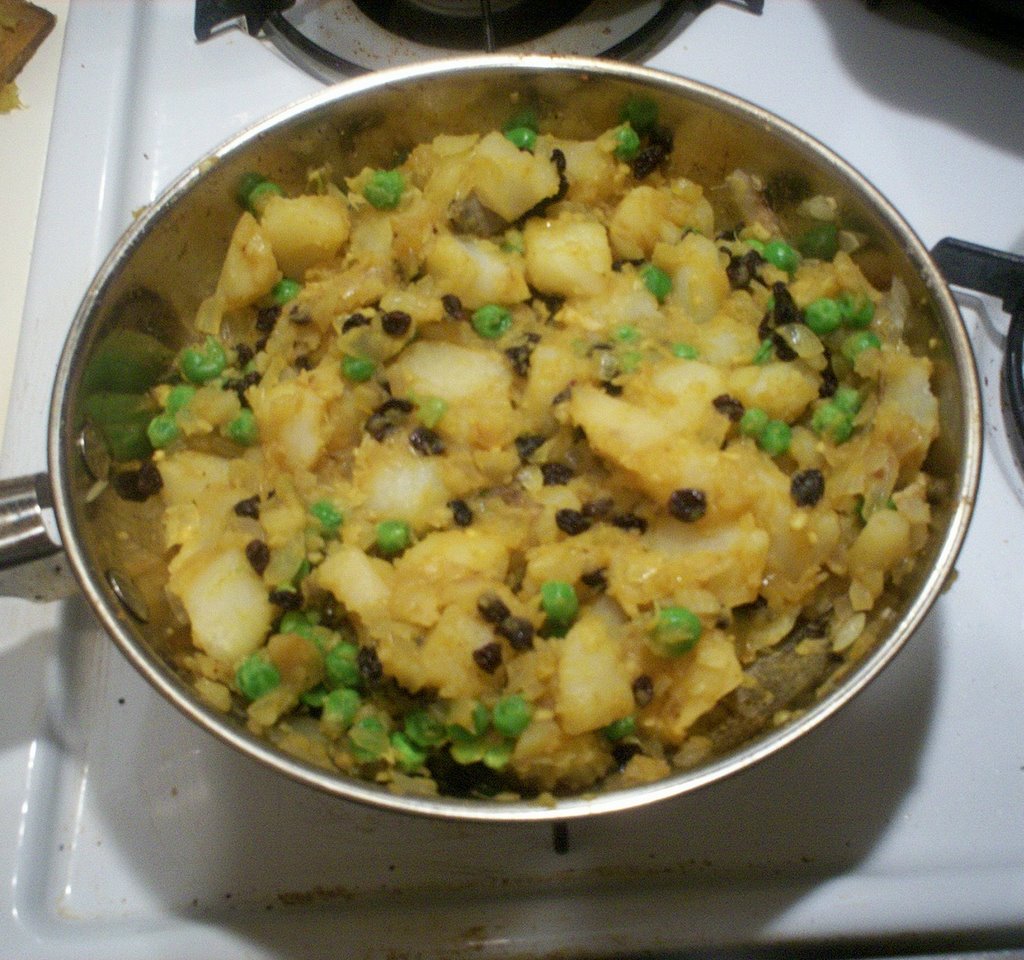
Heat oil in a stainless steel or cast iron skillet (oil should never smoke). Add dried spices and sauté over medium heat for 45 seconds to two minutes, until spices turn slightly darker and become fragrant. Add onion, garlic, and ginger and sauté until onion becomes translucent. Add potatoes and stir well. When all spices are evenly incorporated throughout the potatoes, add the peas, almonds and dried fruit, if using it. Remove from heat and set aside.


Prepared samosa filling with almonds and currants
To roll out dough and fill samosas:

Knead the dough for about two minutes.

Set up your workspace with an area (countertop or cutting board) large enough to roll the dough out, a small cup of water (1/2 cup) for dipping your fingers, a small amount of flour (less than 1/2 cup) for dusting your board, a bowl with the prepare filling and a small spoon, and two platters, plates or cookie sheets, one lined with parchment paper or a covered with a floursack towel and the other lined with paper towels.

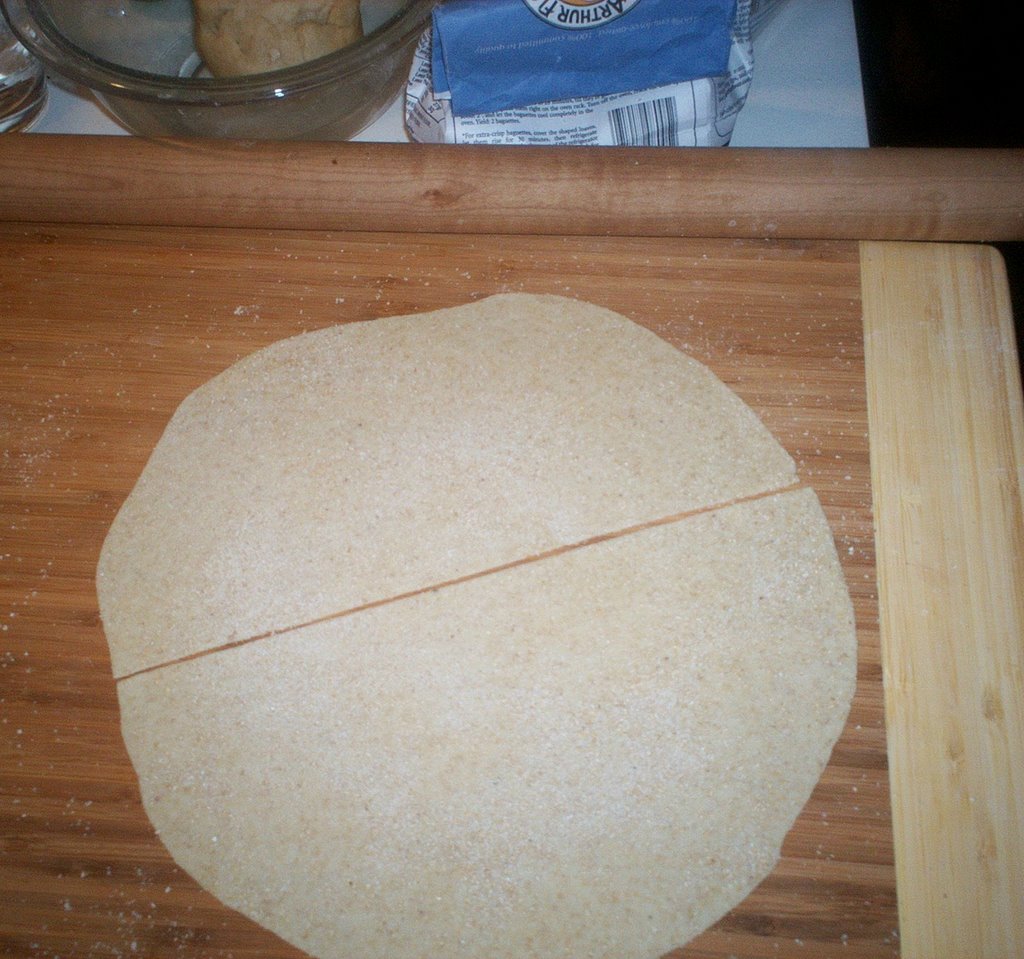
Lightly flour your rolling area. Use just enough flour so that your dough will not stick, but not so much that thedough is completely caked in flour, either. Cut off a golf-ball-sized piece of dough, and roll it out into a large circle, approximately 6-8 inches in diameter. Cut the circle in half.

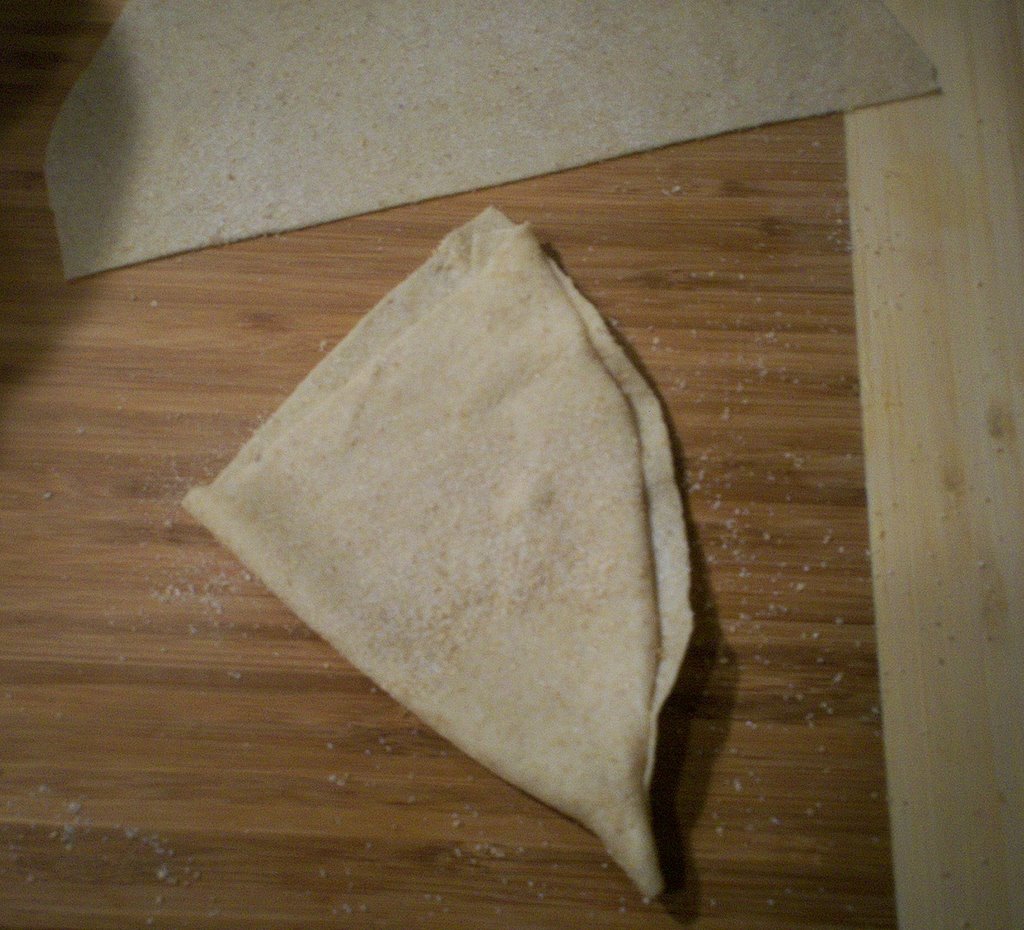
Fold one half circle in half.

Wet the top rounded edge of the quarter circle, then fold the bottom rounded edge over and gently press, so that you have a hollow cone.


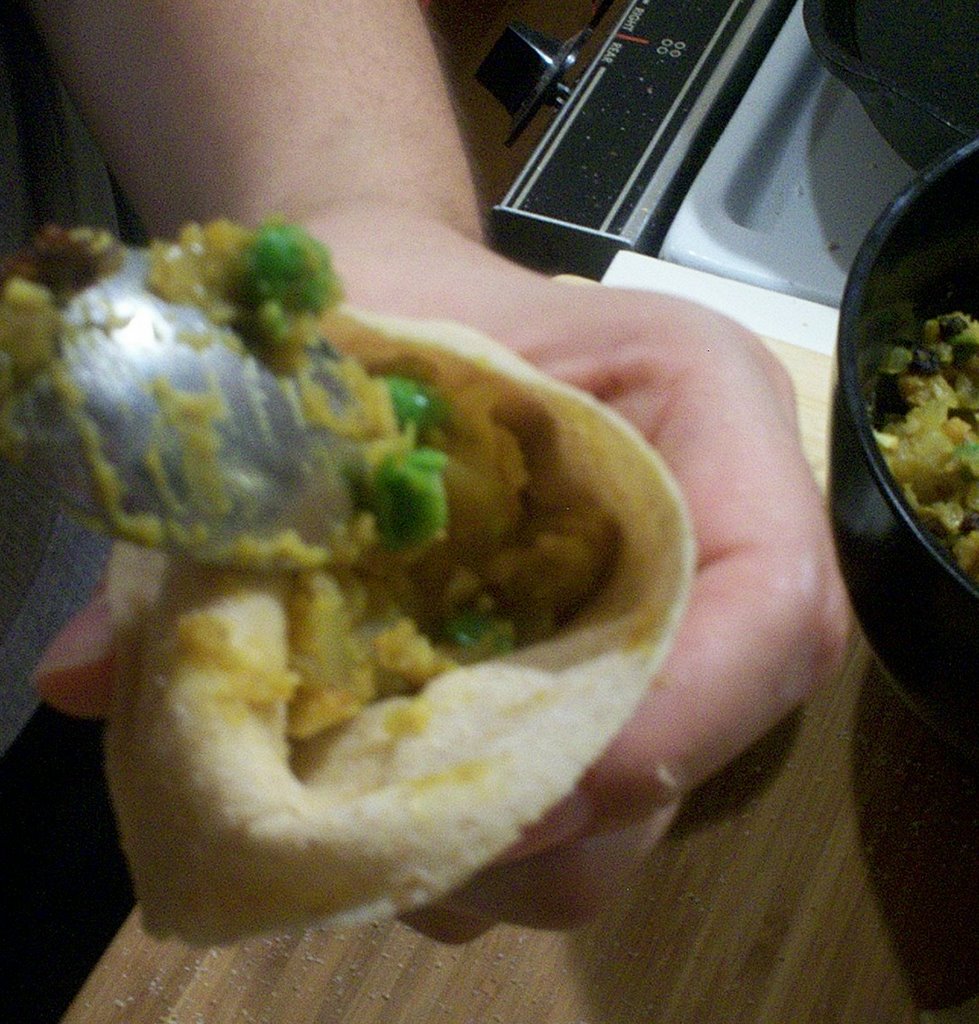
Being careful not to tear the dough, use the small spoon to gently fill the cone 3/4 of the way full.

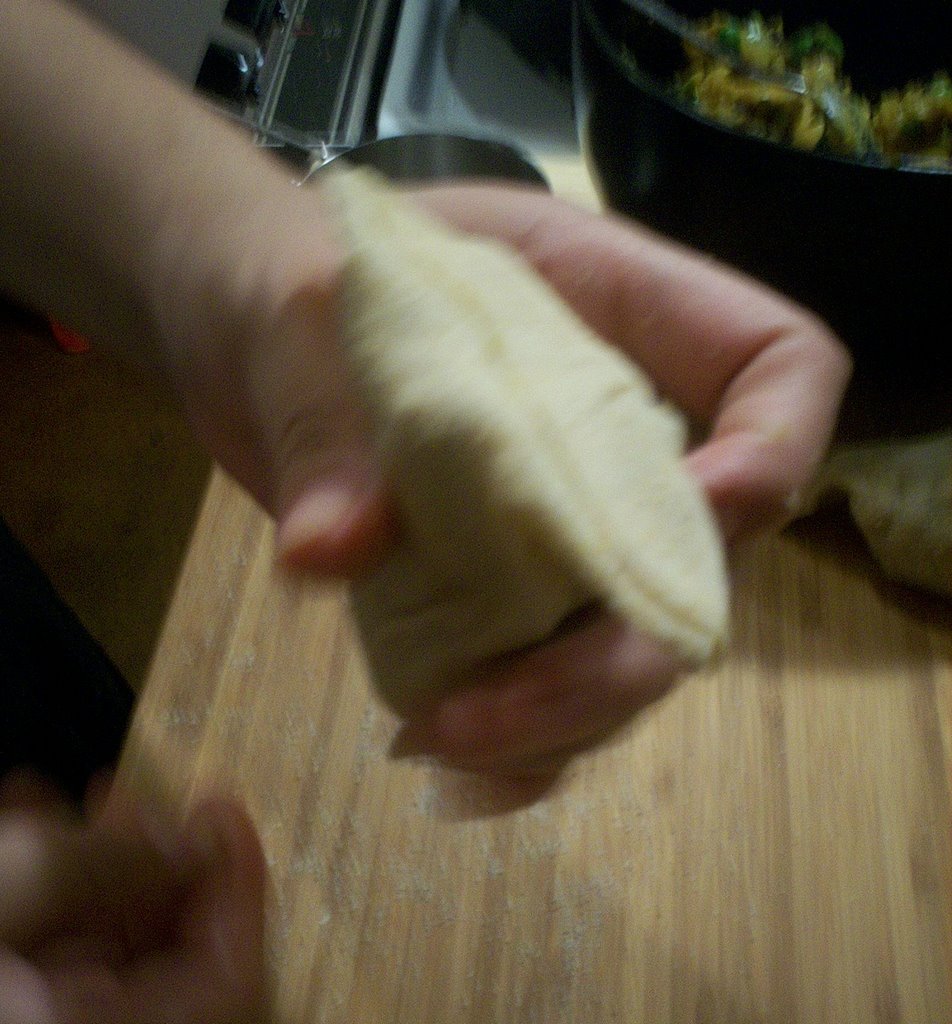
Once the cone is 3/4 of the way full, lay one half of the unfilled portion of the cone down over the filling.

Next, wet the free-standing edge and gently fold and press it over the samosa.

Gently heat the organic safflower oil, rice bran oil, or sunflower oil. I used about 1 cup in an 8 inch cast iron pan, but if you have a tempura pan or something similar, use it, and fill with about 1 inch of oil. Oil is hot enough when a wooden chopstick inserted into the oil bubbles, or alternately, when a small, dry piece of dough is dropped in the oil and it bobs up to the surface almost immediately. Be careful to make sure oil does not smoke.

When oil is hot, gently place a few samosas in pan being careful not to overcrowd pan. Samosas will need to be turned at least once. If samosas are especially full, they may have three sides to brown. When a samosa is brown on all sides, remove it and let it drain on paper towels. I use cooking chopsticks for this as they give me more control and make less of a mess than skimmers.

Serve samosas warm. Especially delicious with chutney.


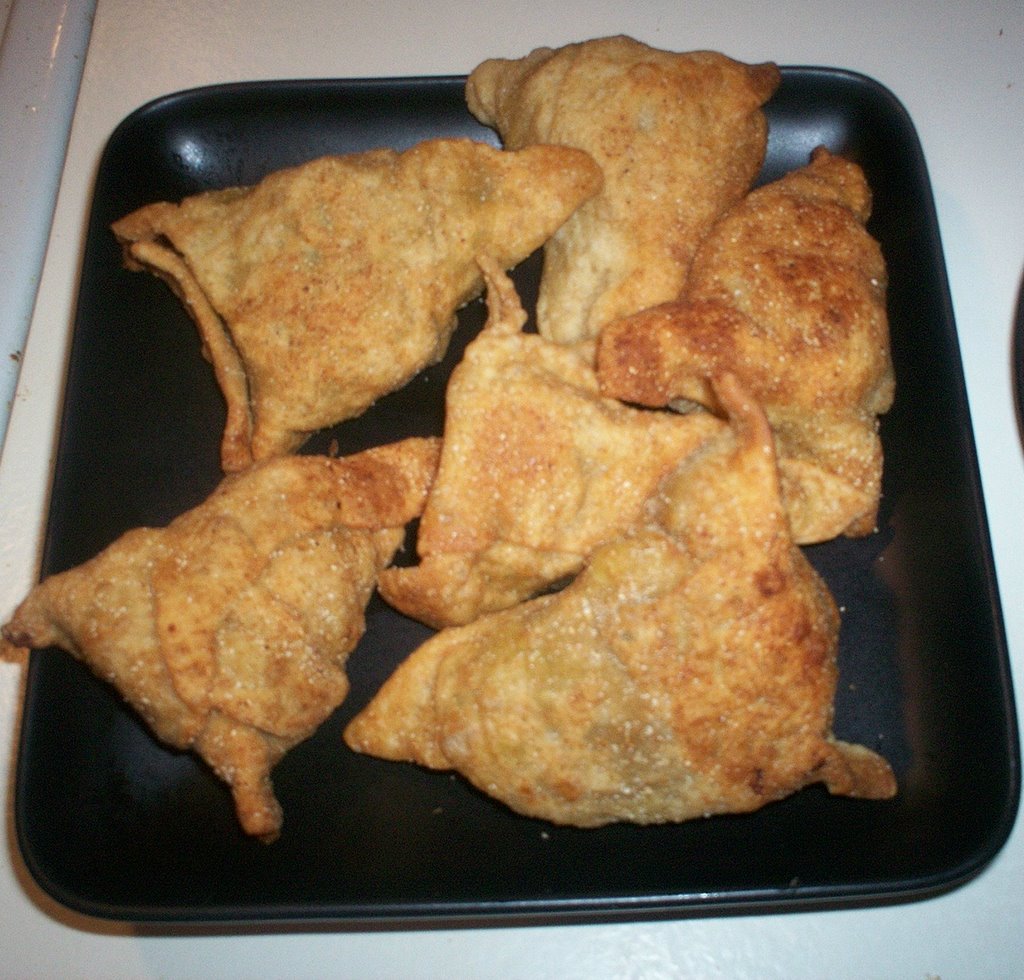
Samosas filled with curried potatoes, peas, almonds and currants.

Notes:

You may use unbleached white flour or regular whole wheat (or even spelt flour), but I've found that the color and texture are best when I use white wheat flour. White wheat flour is a whole wheat flour that is made from a lighter variety of wheat, so it is lighter in color and softer, but still contains the bran, which gives it more texture and nutritional value than white flour (which contains no bran). It's kind of like the difference between white rice and brown rice. Neither whole wheat flour nor white wheat flour are really whole grains, though. Flours, by definition, cannot be whole grains as they have been ground. I have not tried to make any gluten-free samosas, but I'm sure garbanzo bean flour would be appropriate as far as taste.