Vegan MoFo Wordless Wednesday: Chocolate Raspberry Silk Pie


 Nishime style cooking is a very comforting, relaxing way to cook. It's basically a Japanese slow braising technique that uses very little water, and increases the nutritional value by adding the sea vegetable kombu, or kelp.
Winter White Nishime
by Christina Terriquez
Ingredients
water
2 square inches kombu
1 daikon radishes
1 medium or large white onion
1/4 head of cauliflower
sea salt
plain brown rice mochi
shoyu
Directions
Place 1/2" of water in a heavy pot with a tight-fitting lid. Place kombu in water for at least 10 minutes to soften.
Cut diakon into 1 1/2" rounds, or 1 1/2" diagonals and set aside. Cut onion into 1/2 inch thick wedges, making sure to root end intact so wedges stay whole. Cut cauliflower into large florettes and set aside.
Once kombu is soft, remove it from water, and cut into 1/2" squares. Spread kombu squares out over bottom of cooking pot.
Carefully place daikon in a mound on one side of the pan. Add onion wedges next to daikon, leaving a vertical 1/3 space free. Carefully arrange cauliflower florettes in the remaining space, so that the top of each florette is pointing up. This is important so that the mochi can melt over the top of each florette.
Sprinkle a large pinch of sea salt over all of the vegetables and cook over low heat for 15 minutes.
While the vegetables are cooking, carefully slice the mochi into 1/4" thick slices, no bigger than 2"x2". After the vegetables have cooked for 15 minutes, carefully place the mochi slices over the cauliflower. Allow to simmer for 15 more minutes.
After a total of 30 minutes, sprinkle about 1 teaspoon of shoyu over the vegetables. Simmer for 5 more minutes or until tender.
Notes
This style of cooking is best during the fall and winter, since it takes a long time, and works best with the dense, hearty vegetables that are in season during the winter. But it is possible to use vegetables like zucchini and celery.
Try omitting the mochi.
Other vegetables that work well include: turnip, rutabaga, any winter squash or pumpkin, carrots, lotus root.
 This is another one of those things that I never really thought about posting, because it seemed too basic, or something.
We had a vegetarian house guest for a couple of months this summer, and I made this, which impressed our guest, who had only eaten Boca Chick'n patties in sandwiches, and never much thought about different ways to use them before. I also had an (omni) friend over for dinner after work one night recently, and I threw together this meal, which surprised her with its flavor and texture.
It's obviously not going to fool anyone into thinking they're having real chicken parmesean, but it does hit the same notes in a satisfying and much lower fat, not to mention super quick and easy, way. It's a nice, quick meal, although it's pretty much all prepackaged items, so it's not the freshest, or the least refined thing around. It's easy to keep the items on hand for the days when time is short.
For a 15-minutes-or-less meal of Chick'n Parmeshaun:
Boca Chick'n patties, one per person,
good pasta sauce, see note
FYH, Monterey Jack flavor
dried pasta, whichever shape you like most, I like penne
fresh green veggies like broccoli, sugar snap peas, asparagus, etc.
1) Turn on broiler if using FYH.
2) Put a 3 qt. saucepan full of water on to boil.
3) Place Boca Chick'n patties on a baking sheet, with 2--3" between each.
4) Pour sauce, as desired, over each patty. I typically use about 1/4 cup for each patty.
5) Crumble and sprinkle FYH over each patty.Like this.
6) Place in oven or toaster oven for approximately 10 minutes, until patty is thawed and warm, and FYH is dark and melty.Like this.7) Meanwhile, blanch your choice of veggies in water as soon as it comes to a rolling boil. My veggie of choice for this meal is always broccoli.
8) Remove veggies from water when they are tender crisp. Add salt to water and let water return to boil.
9) Add pasta to boiling water and cook until al dente.
10) Dress your pasta. I usually add a dab of EB or a drizzle of olive oil, then a good sprinkle of nutritional yeast and garlic powder(fresh garlic is too strong), but sometimes I mix it up and keep the pasta plain with a drizzle of olive oil or EB, or heat some pasta sauce up and cook the pasta in the sauce for a few minutes.
11) Serve chick'n patty over dressed pasta, with a big side of cooked vegetables.
Notes
You can make a fresh green salad, sauté your vegetables, or cook something like kale in a separate pot, and omit step 7.
I love FYH, but if you're a diehard Daiya fan, or can't get enough Teese, you can use those. I've never tried them in this dish, so I don't know how long they would take, or if they would need the broiler.
This meal is all about convenience, so I use jarred pasta sauce. If you've got a stock of home canned sauce, or a freezer full of frozen sauce, I'm sure those would be amazing.
If not, look for pasta sauces that don't have sugar listed as an ingredient. The difference between sauces with and without this one ingredient is typically about 40 calories, not to mention a ton of flavor. The sugar tempers down all the yummy tanginess of the tomatoes and the subtleties of the other ingredients, so all you taste is sweet. Gross. I cannot stand super sweet marinara.
My favorite, widely available sauce is Classico's Tomato and Basil. It comes in both conventional, approximately $2, and organic, usually $3.50 or less. One serving is 1/2 cup and contains 50 calories. Classico's Tomato and Sweet Basil, on the other hand, is similarly priced(though I'm not sure if it's available in an organic version) DOES contain sugar, and one 1/2 cup serving is 90 calories. I'm not a fanatic about calorie counting, but this is a crazy big difference. It's always good to read labels to check out more than just the vegan-ness of ingredients.
I like making one extra patty and taking the leftovers for lunch. It travels super well, and it takes no more effort to make 1 or 2, than it does to make 3 or 4. The FYH will not remelt unless you broil it again, though....but I enjoy the once-melted texture.
 This was just a quick lunch I whipped together. This is the kind of one pot meal I often eat, although I usually add more vegetables. I don't usually post about this kind of thing, because it seems pretty basic, but it's a great, easy meal to put together.
I was cooking for JD and I both, so I couldn't add asparagus, spinach, mushrooms, or broccoli and the kale and carrots both had to be really well cooked and small. I had some leftover penne, and I made a big pot of chickpeas the other day, so I would be able to throw stuff together easily this week, so they were the foundation of this one pot meal.
First, I sautéed the chickpeas so they'd be a bit more tender, and added the seasonings; garlic* nutritional yeast, crushed red pepper flakes, sea salt, fresh ground black pepper, and a tiny dash of Old Bay. While that was simmering, I washed and cut the kale and carrots. I know it doesn't look like it, but that's a whole bunch of kale, and only half a package of penne; all of the kale is just hiding out below. After the greens were tender, I added the penne and cooked until it was warm, and the liquid had all evaporated. I wanted dry pasta with a "fried" texture today, but it would equally good with a bit of unsweetened soymilk to make it saucier. Or with any of the vegetables I mentioned above, or even diced onion, zucchini, or roasted red pepper. Yum.
*The garlic I've been getting lately has been really aggravating! It looks like a regular head of garlic, but when you go to peel one clove, it falls apart into 6 unpeeled cloves, then when you try to peel one of those really small cloves, they fall apart into 3 microscopic cloves! It gets really frustrating, really quickly. How anyone else come across this?
 And without a hand mixer! I have a lot of kitchen gadgets, ice cream makers, pressure cookers, grapefruit extractors, citrus reamers, zesters, pasta machines, you name it, I probably have it, with one notable exception. Hand mixers.
I've never really a seen the benefit when compared to the amount of use I would get out of them. Hand mixers just whip things really fast. I can whip things. A hand mixer would be sort nice for nostalgia, because it's what my mom had, but other than that, I don't think I'd use it much. Especially since I can already make good vegan buttercreme icing.
I don't use cane sugar much, preferring less refined sweeteners like agave nectar, rice syrup, and maple syrup for the most part. One case where liquid sweeteners just don't cut it, though? Icing. If you want peaks of pipe-able icing, you really have to use powdered sugar. I've tried tons of different things, but none really work.
I've tried tofu. Silken and firm. It's gross. Don't even bother, it taste like tofu, and retains the properties of tofu. I've made mousses and ganaches, and sometimes you can pipe them, but they either melt quickly, dry and crack, or slip and slide.
My biggest tip for incredibly smooth and creamy icing is start by mixing the fat and liquid.
Obviously, the ingredients will vary based on what flavor you want, but I made a basic Lemon Creme Icing today with the following recipe.

Lemon Creme Icing
by Christina Terriquez
Ingredients
1/4 cup solid oil (palm oil, coconut oil, EB, or vegetable shortening)
1 large pinch sea salt
1/4 cup unsweetened non-dairy milk, room temperature
lemon extract or edible lemon oil
juice of 1 lemon
1/2 teaspoon of organic lemon zest, minced
3--5 cups powdered sugar
turmeric, if desired for color
Directions
In a large bowl, stir oil or shortening and sea salt to smooth out any lumps. Add non-dairy milk and mix well. Mixture should be slightly emulsified at this point. Add 6 drops of lemon oil or 1 teaspoon of lemon extract, lemon juice and lemon zest and stir to combine.
Add 1 cup of powdered sugar and stir well. Mixture should be very thin, but lump free. Repeat two more times. Taste, and if needed, add more lemon oil or extract. Add turmeric if desired at this point. You should need no more than 1/2 teaspoon, since adding any more may greatly alter the flavor.
Once color and flavor are as desired, add more powdered sugar until desired consistency is achieved.
Notes
Adding less sugar will give you a glaze or a spreadable icing. Add more sugar for a pipe-able icing.
I used coconut oil for this batch of lemon icing, since the weather is cool and the icing wasn't in danger of melting, but I would not use this during summer or in a hot climate.
You can use the same technique for other flavors, for example for peanut butter frosting, use 1/4 cup peanut butter, 1 tablespoon solid oil, and omit all lemon ingredients and turmeric.

 From what I've seen, all of the Gardien products are transitional and convenience foods. They're perfect for people who want or need to cut back on their meat consumption, but would have no idea what to do with a block of tofu; for new vegetarians who aren't yet used to cooking meals where a meaty main dish isn't the focus; for long time veg people who've got a craving for something a little meatier; and for anyone who is busy, but wants a meal that's healthier than fast food.
The Beefless Tips come frozen as 1 inch cubes. To prepare them, I browned them in a cast iron frying pan with a bit of olive oil, as the directions suggested, then used some white wine to deglaze the pan, a few drops of shoyu, and crushed garlic. Next time, I would add more water, a bit of dijon mustard, and maybe some fresh thyme. I served them with mashed potatoes and fresh asparagus.
The texture was nice and light, much more tender than I expected. A bit of the grain and vegetable texture came through the beefless tips-I could see some white pieces, and feel some diced onions-which was unexpected, but I actually really enjoyed. The flavor was very mild, and the beefless tips seemed to soak up whatever flavor you put on them. They would probably be very nice in a stew during the colder winter months, on kabobs during the summer, or maybe sliced into thirds and used for a beef and broccoli-type dish.
I would buy these again, especially if I was visiting my family. My two complaints are that the package contains 2.5 servings, which is an odd amount, and I wish that they made beefless filets or beefless roasts because for me, cubes are not very versatile, and I would find it much more useful if I could cut them however I wanted. JD enjoyed the meal, and said they were okay, although "they taste like fake meat, but that's to be expected."


 I've been absent for a bit, but I've still been cooking, of course. I've also updated a few things here on the blog, published a few old posts that were languishing in my drafts folder because the pictures had not been uploaded, and created a flickr account (the slideshow in the corner also links to my photostream) so I can upload pictures, when there's no story or recipe to necessitate a blog post.
It's been insanely hot here, which means three things, 1) I don't feel like being active, 2)I've been having a decreased appetite, and 3) I don't feel like slaving over a hot stove. Taking all of those things into account, here's a simple, refreshing recipe to help beat the heat. Horchata is a sort of chilled and spiced rice milk. It's almost always served at taquerias, where it's one of the three most common flavors of aguas frescas. It's made with different seeds or nuts, and just about every recipe has a different ratio, so play with it, and see how you like it. Apparently, in many areas of Mexico, sweet melon seeds are used, in Puerto Rico, sesame seeds are used, and in Spain, tigernuts are used. I'm only familiar with almond horchata, but that's probably just because they are more widely available here...I mean, I've never even seen a tigernut. This horchata will be a bit thicker than normal to allow for adding ice which will melt and dilute the flavor--and sweet, but just sweet enough so it's refreshing, although you can make it a bit thinner and sweeter than you want the finished product to be.
Horchata
by Christina Terriquez
1 cup organic long grain brown rice, rinsed
1 cup organic blanched raw almonds or raw pumpkin seeds
6 cups spring or filtered water, or more
1 whole cinnamon stick
1/2 vanilla bean or 1 teaspoon organic vanilla extract, alcohol-free variety
2–4 tablespoons organic agave nectar, or other sweetener, or more to taste
ice or water, if desired
Directions
Combine the rice and almonds 2 cups water and let soak 4 hours or overnight.
Pour into a blender. Add cinnamon stick and vanilla bean now, if using. Process until the rice is finely pulverized. Add the remaining water, agave nectar and vanilla extract. Strain through double or triple layered cheesecloth. Sweeten to taste.
Refrigerate for 2 hours and/or pour over ice. Serve chilled.
Variations
Add 1 whole organic cinnamon stick before soaking or 1 teaspoon ground organic cinnamon after
straining.
In different regions of Spain, Central America and South America, various seeds and nuts are used. Experiment with substituting sesame seeds, melon seeds or sunflower seeds for the almonds.
Try a 1/4--1/2 teaspoon fresh organic lime zest.
Basmati rice, white basmati, or white long grain rice may also be used.
Yield: One 9-inch pie shellAll-Purpose Vegan Pie Crust
Christina Terriquez
Baking time: 10 minutes
1 cup organic whole spelt flour or whole wheat flour
1 cup organic white spelt flour or unbleached white flour
½ teaspoon unrefined sea salt
½-3/4 cup cold organic safflower oil
1/4 cup cold organic, unsweetened soymilk
1. Stir flours and salt together in a large bowl with a fork. Add oil, mixing with fork while pouring over dry ingredients. Mixture should resemble pea-sized crumbs when oil has been incorporated.
2. Add 1/4 cup soymilk and gently mix. If dough is too dry, add more soymilk 1 tablespoon at a time until dough comes together. Being careful not to knead, as kneading will develop gluten and make crust tough, form dough into a ball with hands.
3. Flatten dough into a 5-inch disk and place on a large sheet of unbleached parchment paper that measures at least 12 inches in diameter. Center a second sheet of paper of equal size, over the dough. Roll dough into 12-inch circle, pressing rolling pin against center of dough and pushing out towards edges. Turn dough and continue rolling until dough reaches desired size.
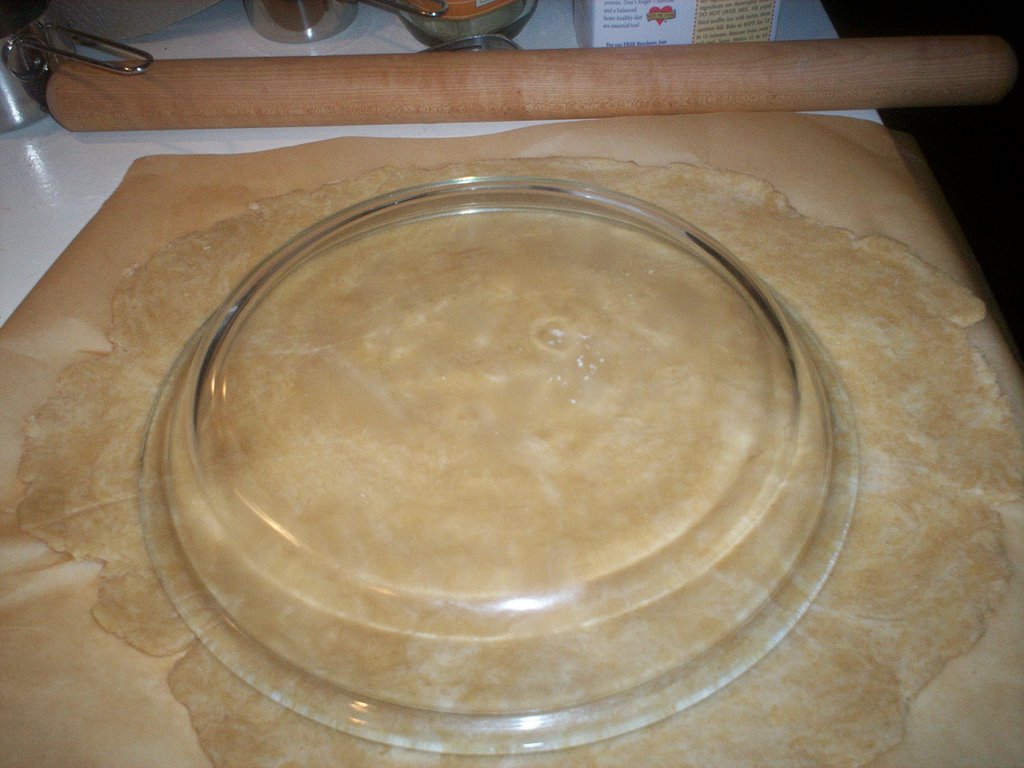
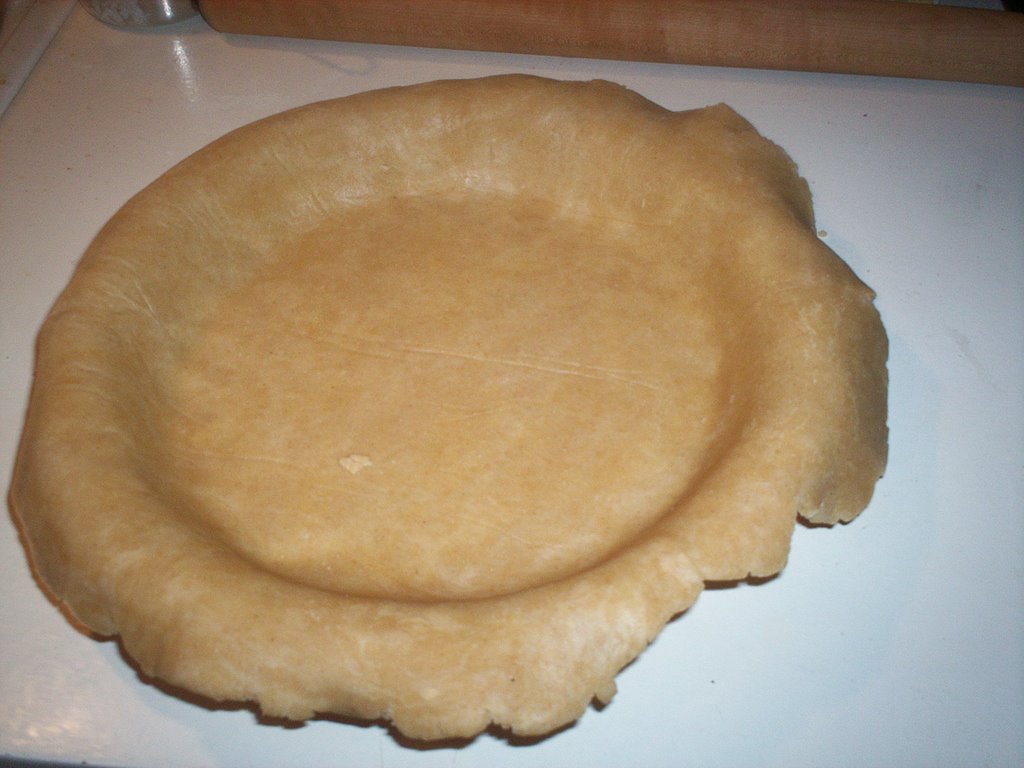
4. Remove and discard top sheet of paper. Center an inverted 9-inch pie plate over dough.Slide hand under remaining sheet of parchment paper and carefully invert paper, dough, and pie plate in one motion. Remove and discard parchment paper.
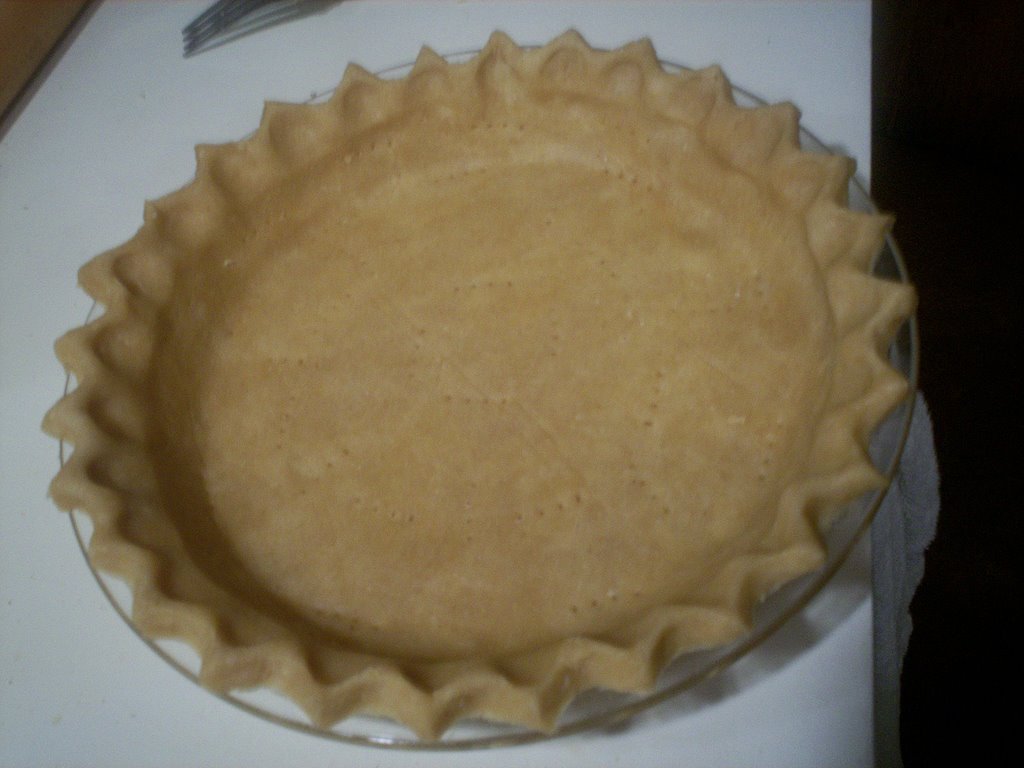
Press dough into edges of pie plate. Trim excess dough to within 1/4 inch of rim. Flute edge as desired.
5. The classic pinched flute edge: starting at the 3 o'clock point on the pie, use your right thumb and forefinger to pinch the rim of dough, while using your left thumb to press down the mound created, thus forming a small "v" shape. Rotate pie plate approximately 1 inch and continue until you've reached the end.
6. Prick bottom of crust, to keep it from bubbling up during baking, and pre-bake crust in a 350º oven for 10 minutes before adding filling, to keep it from becoming soggy.
Notes:
The amount of liquid varies based on freshness of flour, humidity, and type of flour. Spelt flour does not absorb liquid as well as wheat flour does, so when you bake with spelt, you may need to reduce flour by as much as 1/4.
To ease rolling and avoid dryness, roll crust out as soon as it is made. I recommend making, rolling and partially baking crust all at once to avoid dry, cracked edges.
Parchment (or waxed paper) is essential to making this crust. Parchment enables you to easily roll the dough without adding more flour to keep the dough from sticking to your counter or cutting board, and it enables you to easily flip the crust into your pie plate. I use unbleached parchment.
The classic pinched flute edge is simple but seems impressive. It looks like you spent hours, but takes less than five minutes.